


📖 View and download the Ionmax Rhine Pro user manual [PDF] here.
PLEASE NOTE:
The user manual may be altered at any time to assist in quality improvement.
The design and product development may be upgraded without public notice.
*Please remove filter packaging before use.
 |
This unit uses a flammable refrigerant. If the refrigerant leaks and comes in contact with fire or heating parts, it will create harmful gas and there is a risk of fire. |
 |
Read the user manual carefully before operation. |
 |
Further information is available in the user manual and service manual. |
 |
Service personnel are required to read the user manual and service manual carefully before operation. |
SAVE AND READ THESE IMPORTANT SAFETY INSTRUCTIONS
Important Safety Instructions
ℹ️ Please read all instructions carefully before operating
⚠️ This appliance is intended for use in an indoor environment only. Any other use is not recommended by the manufacturer and may cause fire, electrical shocks or other injuries to surrounding people or property.
⚠️ This appliance is not intended for use by persons (including children) with reduced physical, sensory or mental capabilities, or lack of experience and knowledge, unless they have been given supervision or instruction concerning use of the appliance by a person responsible for their safety. Children should be supervised to ensure that they do not play with the appliance.
This unit uses a flammable refrigerant. If the refrigerant leaks and comes in contact with fire or heating parts, it will create harmful gas and there is a risk of fire.
- The unit is designed only for use with R290 (propane) gas as the designated refrigerant.
- The refrigerant loop is sealed. Only qualified technicians should attempt to service this unit.
- Do not discharge the refrigerant into the atmosphere.
- R290 (propane) is flammable and heavier than air. It collects first in low areas but can be circulated by a fan.
- If propane gas is present or even suspected, do not allow untrained personnel to attempt to find the cause.
- The propane gas used in the unit has no odours. The lack of smell does not indicate a lack of escaped gas.
- If a leak is detected, immediately evacuate all persons from the room, ventilate the room and contact the local fire department to advise them that a propane leak has occurred.
- Do not let any persons back into the room until the qualified service technician has arrived, inspected the situation and advised that it is safe to return to the room.
- No open flames, cigarettes or other possible sources of ignition should be used inside or in the vicinity of the unit.
- Component parts are designed for propane and non-sparking. Component parts should only be replaced with identical repair parts.
⚠️ Failure to abide by this warning could result in an explosion, death, injury, and property damage.
Operational Precautions

- This unit is intended for domestic and light commercial/industrial use ONLY and not for heavy commercial/industrial or outdoor use.
- Install the unit on a flat and stable surface to reduce vibrations or noise.
- Do not tip the unit to any side as spilled water may damage the unit.
- Ensure that the drainpipe is placed downwards after installation so that the water can be continuously discharged.
- Never immerse the unit in water or other liquids, or touch the unit with wet hands.
- Do not operate the unit with a damaged cord or plug, after it malfunctions or has been dropped or damaged in any way. Return to an authorised service facility for examination and repair.
- When the unit is being moved, cleaned, serviced or stored, be sure to unplug and switch off the main power supply.
- Please connect the unit to a power socket with a grounding wire and ensure that the wiring of the socket is installed in accordance with national regulations.
- Where possible, avoid the use of an extension cable as it may overheat and cause a risk of fire. Only use an extension cord after ensuring it is in perfect condition.
- Check the household voltage to ensure it matches the unit’s rated specification before operating.
- The unit contains a compressor. If the unit has been tilted or laid on its back, stand the unit upright for at least 1 hour before operating.
- Operate this unit at an ambient temperature between 5°C and 35°C.
- If the unit is used in the basement, storage room, or other environments, there must be sufficient air circulation, otherwise, the dehumidification function may not be effective.
- Ensure that the air inlets and outlets are not blocked or covered.
- Never insert any object into the unit to avoid any hazard or unit failure.
- Do not place the unit too close to curtains or other objects - minimum 30cm.
- When using the unit to speed up the drying of wet clothes in the room, please keep the clothing at a safe distance from the unit to prevent water from dropping onto the unit.
- Never place anything on top of the unit and do not cover it with any kind of material while in use.
- To protect against electrical shocks, do not immerse the unit, plug or cord in water, or spray with liquids.
- Never unplug the power cord without pressing the Power button to switch off the unit first, as this could damage the unit.
- Always unplug the unit when not in use or moving locations. To disconnect from the power supply, grip the plug and pull from the power socket. Never pull by the cord.
- Always empty the water tank before storing the unit away.
- Do not run the power cord under carpeting, or cover it with rugs or runners. Arrange the cord away from areas where it may be tripped over.
- Never operate or store the unit in direct sunlight.
- To repair the unit, take it to a qualified service engineer. Repairs carried out by unqualified people may cause damage to the unit or injury to persons or property and void the warranty.
- Do not use the unit without the air filter.
- Do not use any means to accelerate the defrosting process or to clean, other than those recommended by the manufacturer.
- The unit should be stored in a room without continuously operating sources such as open flames, operating gas appliances or operating electric heaters.
⚠️ Any persons involved with working on or breaking into a refrigerant circuit should hold a current valid certificate from an industry-accredited assessment authority, which authorises their competence to handle refrigerants safely in accordance with an industry-recognised assessment specification.
⚠️ Servicing shall only be performed as recommended by the equipment manufacturer. Maintenance and repair requiring the assistance of other skilled personnel shall be carried out under the supervision of a person competent in the use of flammable refrigerants.
For the service manual or further assistance, please contact Ionmax.
Features
- Compressor dehumidifier - suitable for warm climates
- HEPA air purifier - comes with a HEPA H13 filter - use the appliance as an air purifier to improve air quality and remove fine particles from air
- Environmentally friendly - uses eco-friendly R290 refrigerant
- Moisture removal - 40 litres/day (30°C RH80%) with HEPA filter, 50L/day (30°C RH80%) without HEPA filter
- Water tank capacity - 5 litres
- Digital humidity display - set and view relative humidity levels with ease
- Air quality indicator - indicator light changes colour based on detected indoor air quality (based on detected PM2.5 levels)
- Up to 9-hour timer - for added convenience
- Continuous mode - dry laundry faster indoors
- Temperature range for use - 5°C to 35°C
- Ergonomic carry handle and universal wheels for easy portability
- Removable water tank
- Auto pause and restart function to save energy - pauses dehumidification once the desired humidity level has been reached and restarts on previous settings if the humidity level increases
- Washable pre-filter - removes large particles such as dust and hair from dehumidified air
- Continuous drainage option - drainage hose provided
- WiFi app control - remote monitoring, settings and scheduling via mobile app
Specifications
Model: Ionmax Rhine Pro ION651
Voltage: AC 220-240V 50Hz
Power consumption: 450W
Net weight: 18.3kg
Dimensions (W x D x H): 384 x 283 x 659mm
Unit Setup

- Place the unit in an upright position on a stable, level surface. Please ensure the unit is not sitting on its own cable.
- Only use the unit in areas larger than 7 square meters.
- Please ensure the unit is a safe distance away from walls and furniture (as shown above).
- Please keep clothes at a safe distance of 30cm from the air outlet of the unit to prevent water from dripping into the unit.
- For best results, position the dehumidifier somewhere central like a landing or a hallway. As long as the internal doors are open, the excess moisture from all of the rooms in the house will migrate naturally towards the dehumidifier and be processed.
 |
Do not install or operate the dehumidifier in the following conditions:
|
 |
Product Description

Control Panel
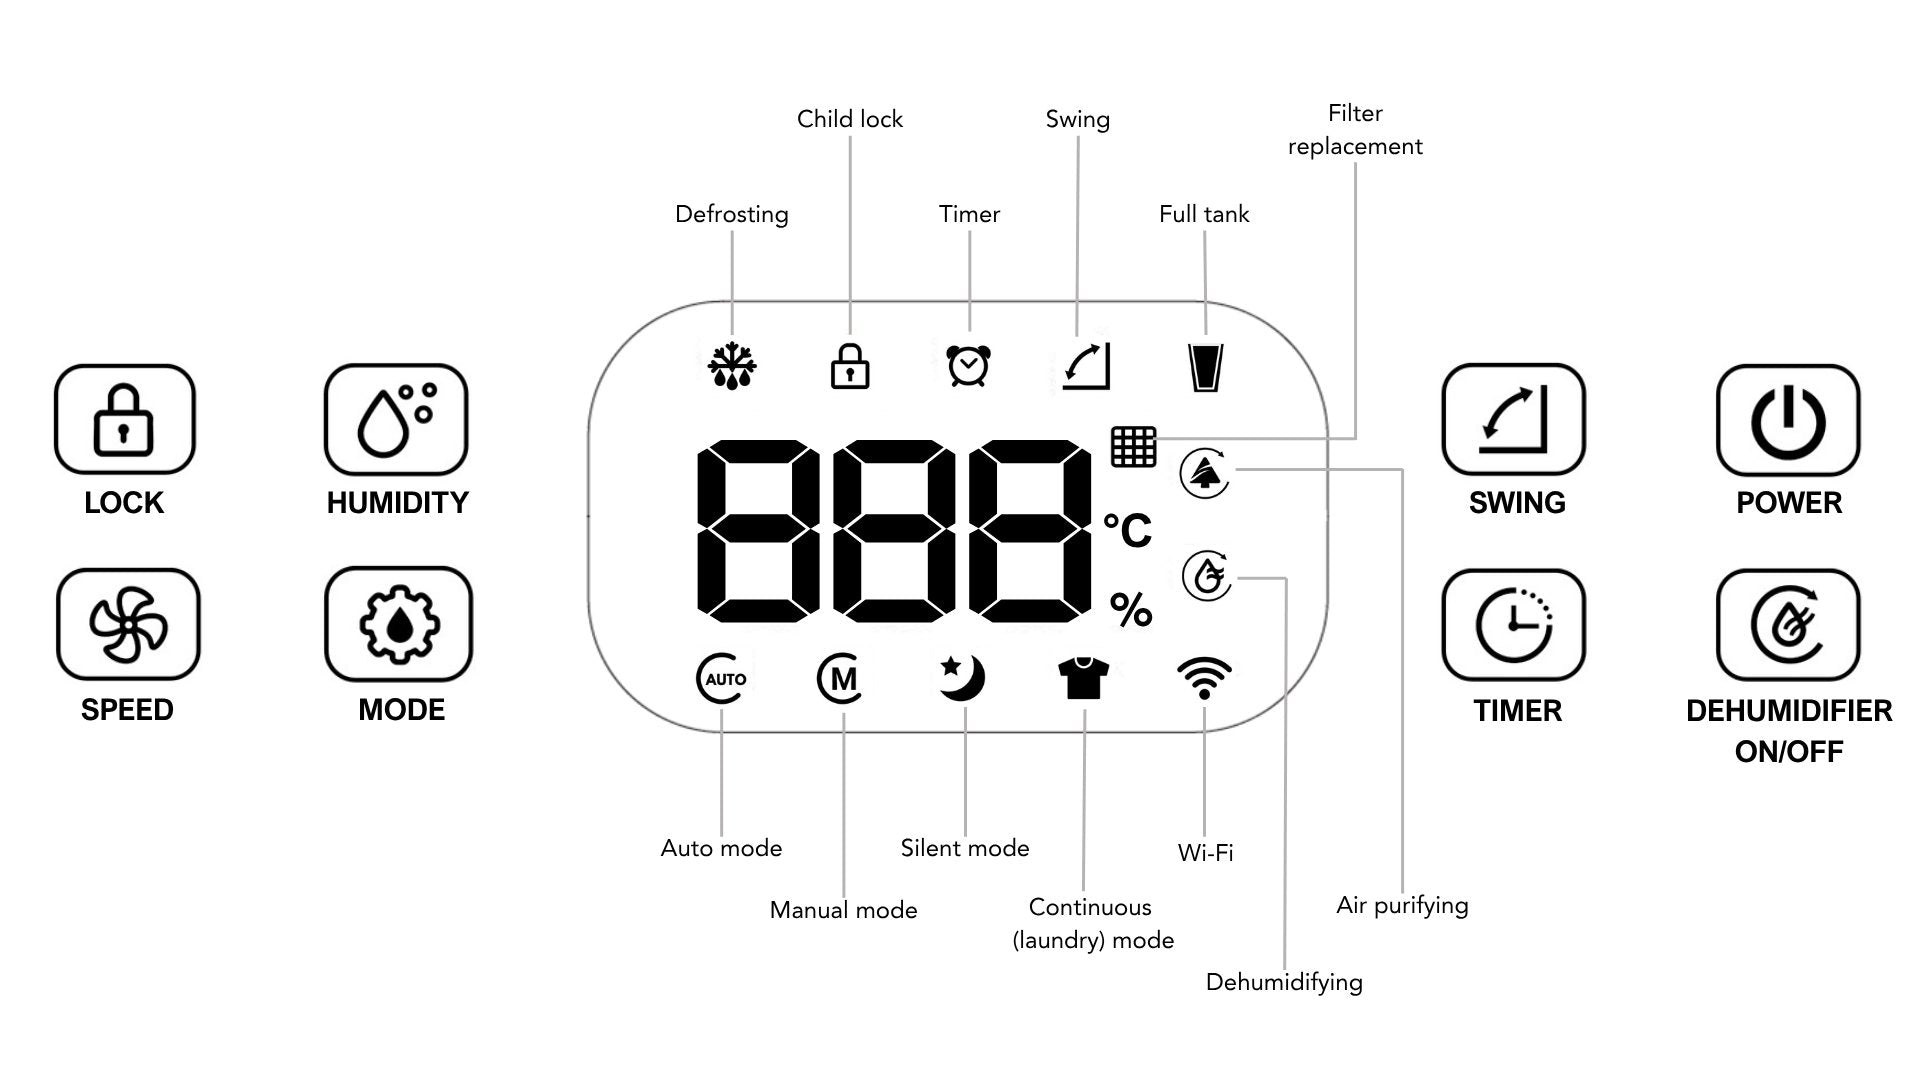
Buttons
 Power: Turns the unit on/off.
 Mode: Toggle between Manual, Silent, Clothes Drying, and Auto Mode.
 Fan Speed: Adjusts fan speed (1 to 3 levels in Manual or Auto Mode).
 Humidity Setting: Set target humidity (from 30% to 80%RH or CO for continuous).
 Timer: Set a shutdown timer from 1 to 9 hours.
 Swing: Activates the swing function for the air outlet.
 Dehumidifier On/Off: Enables or disables dehumidification (air purification remains active).
 Child Lock: Press and hold for 3 seconds to lock or unlock the control panel.
Indicator Lights
 Wi-Fi: Lights up when Wi-Fi is active
 Full Tank: Illuminates when the water tank needs emptying
 Defrost: Shows when unit is in defrost mode
![]() Filter: Flashes when HEPA filter needs replacing
Filter: Flashes when HEPA filter needs replacing
 Dehumidifying: Indicates dehumidification is active, blinks for 3 minutes while compressor warms up.
 Air Purifying: Indicates air purification is active
 Swing,
  Timer,
  Lock: Shows relevant functions are active
Air quality indicator lights: Continuously monitors indoor air PM2.5 levels and displays indoor air quality using a colour-coded indicator light:
| Indicator light colour | Detected PM2.5 level | Air quality indication |
| Blue | ≤50ug/m³ | Excellent air quality |
| Purplish blue | 51-100ug/m³ | Good air quality |
| Purplish red | 101-150ug/m³ | Mild pollution |
| Red | ≥151ug/m³ | Serious pollution |
Operating Instructions
ℹ️ There is a protective 3-minute time delay on the compressor. Please allow 3 minutes for the unit to resume the dehumidification process.
 Power button
Connect the power plug to an appropriate electrical outlet.
Press the Power button to switch on the unit and begin operation. The digital display will light up, showing the current ambient relative humidity. The louvre will automatically open.
When turned on for the first time, the unit will operate in Manual Mode with fan speed set to 3. The compressor will begin running after a 3-minute delay (this will be indicated by the icon blinking).
To turn off the unit, press the Power button again. The indicator lights will switch off, and both the fan and compressor will stop.
Note: When restarting the unit after it's been switched off, it will resume operation using the previous mode and settings.
 Digital Display
By default, the digital display shows the current room relative humidity (RH). The normal display range is 30% to 90%RH.
- LO will appear when the room RH is below 30%.
- HI will appear when the room RH is above 90%.
The display will temporarily change depending on the mode you're adjusting:
- In Humidity Setting Mode, it shows your selected RH level.
- In Timer Mode, it shows the number of hours set before auto shut-off (0h ~ 9h).
- In Fan Speed Mode, it displays the selected fan speed (01, 02, 03, or 04).
View room temperature and evaporative temperature (°C) on the digital display
While the unit is operating, press and hold the Humidity button  for 3 seconds. The display will briefly show the current room temperature and evaporative temperature in °C, then return to showing the ambient relative humidity.
Adjust digital display brightness
While the unit is operating, press and hold the Mode  and Fan
  buttons together for 3 seconds to dim the display to 20% of its normal brightness. The unit will beep once to confirm.
Repeat the same step to return the display to full brightness.
 Humidity button
Press the Humidity Setting button to adjust the target relative humidity (RH) level. The display will cycle through settings from 40%RH to 80%RH in 5% increments, or CO for continuous dehumidification.
- CO (Continuous Operation): The unit will run continuously without monitoring or limiting humidity levels.
- In Laundry Mode, humidity level cannot be adjusted or limited.
| Humidity Level | Recommendations |
|---|---|
| > 60% | Maintain the room at a comfortable indoor humidity level |
| 50% | Inhibit mould and bacteria growth For daily normal household use to maintain humidity at a healthy level of ~55% RH (bacteria and mould will not breed at this level) |
| < 40% | Super dry mode to prevent condensation To control a very damp room in the first couple of days. Then, switch to 50% or higher to save energy. |
Note:
- The unit will stop dehumidifying the air (compressor and fan will switch off) if the room's relative humidity (RH) level is 3% lower than the selected RH level.
-
The unit will begin dehumidifying the air (compressor and fan will begin operating) if the room’s relative humidity (RH) level is 3% higher than the selected RH level.
- There will be an approximate 30-second delay before the compressor and fan starts or stops running once +/-3% of the set humidity level is reached.
 Dehumidifier On/Off button
Press the Dehumidifier button to enable or disable the dehumidification function (compressor).
- When dehumidification is enabled, the dehumidifying icon will blink for 3 minutes as the compressor prepares to start. It will stay solid once the compressor is running.
- When dehumidification is disabled, only the air purification function will operate.
- Note: The air purifier runs continuously whenever the unit is switched on.
Display indicator guide:
-
Air purification and dehumidification are both active
-
Only air purification is active
 Mode button
Press the Mode button to toggle between Manual, Silent, Continuous (Laundry), and Auto Mode. The corresponding mode’s indicator will light up when selected:
 |
Manual modeFan speed and humidity level can be adjusted. |
 |
Silent modeThe digital display will be dimmed. Humidity level can be adjusted. Fan speed will be fixed at 1. Press Mode button to change modes and undim the digital display. |
 |
Continuous (Laundry) modeThe compressor will run continuously regardless of the current room humidity. Humidity level cannot be adjusted. Fan speed will be fixed at 3 and cannot be adjusted. |
 |
Auto mode
The unit will automatically adjust the fan speed according to the detected air quality level.
The unit will automatically adjust the fan speed according to the detected room humidity level.
|
 Fan Speed button
Press the Fan Speed button to cycle through the available speed settings.
- In Manual or Auto Mode, you can choose from three fan speeds (when dehumidifying is enabled) or four fan speeds (when only air purifying is enabled).
- In Silent Mode and Laundry Mode, the fan speed is fixed and cannot be adjusted.
 Timer button
Press the Timer button to set a timer between 1 to 9 hours (1h ~ 9h), or 0h to cancel the timer function (the Timer indicator light will switch off).
Once a timer has been set, the Timer indicator will remain lit up during the timing period.
During the timing period, press the Timer button to view the time remaining. Press the Timer button again to cancel the timing.
 Swing button
Press the Swing button to activate or deactivate the louvre movement.
-
When on, the louvre will move up and down to distribute airflow evenly.
-
When off, the louvre will stop and remain in its current position.
 Lock button
Press and hold the Child Lock button for 3 seconds to lock all control panel buttons.
To unlock, press and hold the button again for 3 seconds.
Automatic Defrosting
When operating in low temperatures, frost may form on the evaporator. To maintain proper performance, the unit includes an automatic defrost function.
-
Defrosting activates automatically when the evaporator temperature drops to -1°C or below.
-
During defrosting, the Defrost indicator
 will flash. The compressor will stop, and the fan will continue running at high speed to help melt the frost.
 -
Once the evaporator temperature rises above 2°C for at least 10 minutes, the unit will exit defrost mode and resume normal dehumidification.
- If, within 30 minutes, the evaporator temperature rises to 0°C or above for at least 2 minutes, the defrost cycle will end early, and the unit will return to its previous settings.
Note: Automatic defrosting only occurs during dehumidification mode.
Safety Protection Features
To ensure reliable performance and protect internal components, the Ionmax Rhine Pro includes several built-in safety functions:
Compressor Protection (Delay Start)
To prevent damage from pressure imbalance in the cooling system, the compressor features a 5-minute delay before restarting after it has shut off—either due to a mode change or malfunction.
Note: This function only applies when the unit is in dehumidification mode.
12-Hour Automatic Shutdown Function
This model includes a built-in safety feature designed for situations where the appliance is left running unattended (e.g. when you're not at home). By default, the unit will automatically shut off after 12 hours of continuous operation.
How it works
If the unit runs continuously for 12 hours, it will automatically turn off to prevent unnecessary energy use or overheating.
When automatic shutdown occurs:
-
A buzzer will sound
-
The timer icon will flash on the display
-
You can press the lock button to cancel the flashing indicator
Resetting the 12-hour auto shutdown
- Any button press during operation will restart the 12-hour countdown from zero.
- If a Timer has been set (1 ~ 9 hours), the unit will follow that timing instead of the 12-hour auto shutdown.
- If the water tank becomes full and is removed and reinserted, the 12-hour shutdown will reset once the unit resumes operation.
To disable the auto shutdown function
This feature can be turned off for long-term use in environments like basements or villas. While the unit is in standby mode, press and hold the Humidity and Fan Speed buttons for 3 seconds.
A buzzer will sound once, and the timer icon will flash once to confirm cancellation.
To restore the auto shutdown function
Repeat the same step—press and hold Humidity and Fan Speed buttons for 3 seconds.
The buzzer will sound twice, and the timer icon will flash once to confirm that the function has been restored.
Alternatively, unplugging the unit and plugging it back in will also enable the auto shutdown function by default.
Extreme temperature protection
The unit will automatically shut off if the ambient temperature is ≤0°C or ≥40°C.
During this time, the fan may continue operating to maintain airflow.
Once the temperature returns to a safe range (≥2°C to ≤38°C), the unit will resume dehumidification.
The dehumidify icon will stop flashing, and the compressor will restart after a 3-minute delay.
Humidity safety protection
If the ambient humidity falls to ≤30%RH, the display will show LO, and the compressor will shut off to prevent over-drying. The fan will continue running based on the previous settings.
Dehumidification will resume when humidity rises to ≥32%RH, after a 3-minute compressor delay.
If humidity exceeds 91%RH, the display will show HI, and the unit will continue operating as normal.
Note: This function only applies in dehumidification mode.
Memory function
The Ionmax Rhine Pro is equipped with a memory function that restores previous settings after shutdown or power interruptions. Please note however that Child Lock settings are not memorised after the unit shuts down.
Power-off memory
If the unit is turned off using the Power button (but not unplugged), it will resume operation with the same mode and settings (except Timer setting) when turned back on.
Power failure recovery
If the unit is unplugged or power is lost, it will automatically resume its previous mode and settings (except Timer and Child Lock) once power is restored.
Timer and child lock reset
If a timer was active with Child Lock enabled, the unit will restart after the timer ends but Child Lock will be disabled.
Mobile App Setup
 |
Download the Ionmax app on your phone. Scan the QR code or visit ionmax.com.au/app
|
- Register a new account on your phone, or log in to your existing account for the Ionmax app.
- Place the dehumidifier at a distance of at least 5 meters from your router. Plug the dehumidifier into an appropriate power outlet and switch it on.
- Ensure that the WiFi indicator on the dehumidifier is flashing during the connection process. If the WiFi indicator is not lit, hold down the Mode button on the dehumidifier for 3 seconds until the WiFi indicator is flashing quickly. This indicates that the dehumidifier is ready for connection.
- The Bluetooth feature and a stable WiFi connection is needed to sync the unit to your mobile device.
-
Method 1: Auto Scan
- Enable the Bluetooth function on your mobile phone.
- Open the Ionmax app on your mobile phone.
- The app will search for the dehumidifier and connect automatically.
- Ensure the WiFi indicator is blinking for Auto Scan to function.
- Follow the prompts on the app to finish the Bluetooth connection.
-
Method 2: Add Manually
- On your Ionmax app, select or create a new location for your dehumidifier .
- Select “Devices” and click on “+” to add a new device.
- Select product type “Dehumidifier”.
- Enter your WiFi network SSID and password on the app. *Please use a 2.4GHz network only.
- Confirm that the WiFi indicator on the device is blinking and click ‘Next’.
- The app will search for the dehumidifier and prompt for connection automatically.
-
Method 1: Auto Scan
- Once the dehumidifier is successfully connected, the WiFi indicator will stop flashing and remain lit up. You can now monitor and operate the dehumidifier using the mobile app.


Emptying the Water Tank
|
 Full tank indicator |
- To remove the water tank, grip the handles of the water tank and carefully pull it out.
- Discard the water from the tank.
- Clean the water tank and reinstall it back into the unit.
The Full Tank indicator light will turn off, and the unit will resume operation using the previous settings.
Note:
- Do not discard the magnets and plastic rivets from the water tank; the unit will not work correctly.
- If needed, clean the water tank by rinsing it with clean water. Avoid using any detergents, chemicals, diluents, solvents, steel wire balls or any other item that might damage it.
- The Full Tank indicator light will light up and the unit will not operate if the water tank is not positioned correctly.
Continuous Drainage Option

The unit comes with a hose that can be connected for continuous drainage. This removes the need to empty the water tank periodically.
Note:
- Ensure the drainage hose is firmly attached to the continuous drainage outlet.
- The drainage hose should not be elevated higher than the drainage outlet of the unit.
When no longer using continuous drainage:
- Disconnect the hose from the back of the unit.
- Replace the drainage outlet's protective cover.
- Replace the water tank to ensure drainage into the water tank.
Maintenance
Cleaning the unit
- Switch off the unit, wait for the fan to stop, then unplug the power cord from the electrical outlet.
- Clean the outer casing of the unit using a soft damp cloth with warm water and mild detergent. Do not use solvents or abrasive materials.
- Dry thoroughly with a soft dry cloth after cleaning.
- In order to avoid damage, do not wash the machine with water or let water drip into the air inlet or outlet.
Cleaning the pre-filter

If the pre-filter is covered with dust, the airflow and performance of the unit will be affected.
Check the pre-filter periodically to ensure any dust is removed.
It is recommended to clean the pre-filter every 2 weeks or at an appropriate frequency depending on your usage and air environment.
- Switch off the unit, wait for the fan to stop, then unplug the power cord from the electrical outlet. Remove the pre-filter located at the back of the unit.
- Clean the pre-filter gently using a vacuum cleaner with a soft brush, or by rinsing with water.
- Leave the filter to dry completely. Then, restore the pre-filter into the unit.
❗ Caution: Never run the unit without the pre-filter. Dust build-up in the unit can cause malfunction and overheating.
HEPA filter replacement reminder
The Ionmax Rhine Pro tracks the usage time of the HEPA filter. After approximately 1,500 hours of operation, the Filter icon ![]() will begin to flash, indicating that the HEPA filter needs to be replaced.
will begin to flash, indicating that the HEPA filter needs to be replaced.
To reset the HEPA filter reminder:
- Replace the HEPA filter with a new one.
- While the unit is running and the Filter icon is flashing, press and hold the Timer button for 5 seconds.
- A beep will sound, and the icon will turn off. The usage time will be reset for the next cycle.
⚠️ Important reminders:
- Always replace the HEPA filter when the icon flashes — do not reset the timer without replacing the filter.
- It is not recommended to operate the unit for an extended period of time without a HEPA filter installed. Doing so may lead to increased strain on the fan and potential malfunction.
- Ignoring the HEPA filter replacement may compromise air purification and pose safety risks.
Before storing
- Switch off the unit, wait for the fan to stop, then unplug the power cord from the electrical outlet.
- Clean and dry the water tank. Leave the unit to drain for approximately one day.
- Clean the filter and the unit. Cover the unit to prevent it from gathering dust.
- Store the unit upright in a cool dry place. Do not expose it to direct sunlight.
- Store the unit in a well-ventilated area larger than 7 square meters that does not have continuously operating sources such as open flames, operating gas appliances or operating electric heaters.
Troubleshooting
The following conditions are normal:
- The compressor will stop or rest for 3 minutes every time the unit shuts down or is plugged into the electrical outlet. This helps ensure a smooth start for the dehumidifier.
- The unit works within room temperature of about 5~35°C. It may stop operation when the room temperature is out of this range or when the air inlet or outlet is covered.
- The unit could increase the room temperature by 1~3°C
If your dehumidifier is not operating as expected, please check the following solutions first:
| Problem | Possible cause | Solution |
|---|---|---|
| Dehumidifier not operating | The unit is unplugged | Make sure the power plug is pushed completely into the electrical outlet and switched on |
| The water tank is full or not in place (the Full Tank indicator is lit up) | Empty the water tank and make sure it is reinstalled into position correctly | |
| Room temperature is less than 5°C or more than 35°C | This is normal and is a self-protection mechanism designed to protect the unit. | |
| Very little water is collected | The room humidity has reached the setting | This is normal. Choose a lower relative humidity setting for drier air. |
| The ambient temperature is too low | This is normal if the temperature is low | |
| The ambient temperature is too high that it causes overheating | Do not use the unit in small and closed spaces where heat may accumulate. Move the unit to a cooler place and wait at least 10 minutes before resuming operation. | |
| Pre-filter is dirty or clogged | Clean the pre-filter | |
| The air inlet or outlet is blocked | Ensure nothing is obstructing the unit’s air inlets and outlets and that the unit is set up correctly according to the Unit Setup guide | |
| Unit is leaking | The unit is not on a level surface | Ensure that the unit is placed on a level surface and not accidentally sitting on a cable etc. |
| The drainage hose is clogged or loose | Ensure the drainage hose is firmly attached to the continuous drainage outlet | |
| The drainage hose is kinked or has bends | Ensure the hose is leading to an appropriate drain at a downward slope with no sharp bends | |
| Unit is leaking while being moved | Empty the water tank before moving the unit | |
| Unit is noisy | Unit is not on a flat and level surface | Move and restart the unit on a flat and level surface |
| Pre-filter is dirty or clogged | Clean the pre-filter | |
| Noise sounds like water flowing | The noise is coming from the flowing refrigerant and is normal. | |
| Powered on but compressor is not running | Humidity level sets incorrectly | Set the desired humidity level lower than the current room humidity level |
| Compressor start is delayed | Allow a few minutes for the compressor to settle down before it is switched on | |
| Compressor is faulty | Contact Ionmax support and do not attempt to fix this as it may cause injury |
Error codes
If any error code below appears on the display, please contact Ionmax Support for assistance.
| Error code | Possible Cause |
|---|---|
| C1 | Defrost sensor fault, or detected temperature is above 40°C |
| C2 | Temperature or humidity sensor fault |
| C7 | Fan motor malfunction and fan stops working for 15 seconds |
| C8 | Possible refrigerant leak (temperature difference between sensors is ≤3°C) |
Please contact Ionmax support if any problem persists. Do not try to repair the unit yourself, as this could cause an electrical shock and void your warranty.
Warranty Details
Congratulations on your purchase! It is our aim to provide you with quality products that you can trust. Our goods come with guarantees that cannot be excluded under the Australian Consumer Law. You are entitled to a replacement or refund for a major failure and compensation for any other reasonably foreseeable loss or damage.
You are also entitled to have the goods repaired or replaced if the goods fail to be of acceptable quality and the failure does not amount to a major failure.
The Guarantee
The product is guaranteed to be free from defects in workmanship and parts for a period of 24 months from the date of purchase. Defects that occur within this warranty period, under normal use and care, will be repaired, replaced or refunded at our discretion, solely at our option with no charge for parts and labour. The benefits conferred by this warranty are in addition to all rights and remedies in respect of the product that the consumer has under the Trade Practices Act and similar state laws.
Proof of Purchase
This warranty is valid for the original purchase and is not transferable. Please keep your purchase docket or receipt as proof of purchase and as proof of date on which the purchase was made. The purchase docket (or a copy) or receipt must be presented with the warranty when making a claim under this warranty.
Service during the Warranty Period
To claim for warranty, contact us on 1300 800 200 or support@andatech.com.au to get an RA# (Return Authorisation Number) or submit a support ticket on my.andatech.com.au. Ensure that the RA# is clearly stated on the outside of the packaging and that the product is properly packaged so that no damage occurs to the product during transit. Shipping of the product back to us for warranty will be at your cost. A product return without the RA# will not be accepted.
Extent of Warranty
This warranty is limited to defects in workmanship or parts. All defective products or parts will be repaired or replaced. This warranty does not cover manuals and packaging.
Normal Wear and Tear
This warranty does not cover normal wear and tear to the product or parts.
Exclusions
This warranty does not cover:
- Any defect caused by an accident, misuse, abuse, improper operation, lack of reasonable care, unauthorised modification, loss of parts, tampering or attempted repair by a person not authorised by the distributor.
- Any product that has been damaged by a lightning strike either directly or indirectly or a main power surge or liquid ingress.
- The product if it is located outside of Australia.
- Any damage caused by improper power input or improper cable connection.
Warranty Registration
Register your Ionmax Rhine Pro online at my.andatech.com.au with a copy of your proof of purchase. Contact us at 1300 800 200 or visit ionmax.com.au for options to extend your warranty.


